Trading Risk Management Starts Before the Trade
Madlytics helps traders plan position size, record risk clearly, and review whether each trade stayed close to the original plan.
Start free trial in MadlyticsRisk management is easier to talk about than to follow. A trade can feel controlled while the stop gets wider, the position size gets rounded up, or one more trade is added after the session should have ended. The useful question is not whether you know the rule. It is whether your trades show that the rule was followed.
What trading risk management means
Trading risk management is the process of deciding the risk before entry, sizing the position from that decision, and reviewing the result after the trade is closed.
It is not a prediction system. It does not make a setup good or bad. It gives every trade a clear risk boundary so later review can separate the trade idea from the way the trade was executed.
The risk workflow in practice
A practical workflow keeps pre-trade planning, the trade record, and the later review connected. That way risk is not only a rule written down somewhere. It becomes part of the trade evidence.
Step 1
Plan risk before entry
Use the actual entry and stop distance to estimate position size before the trade is placed.

Step 2
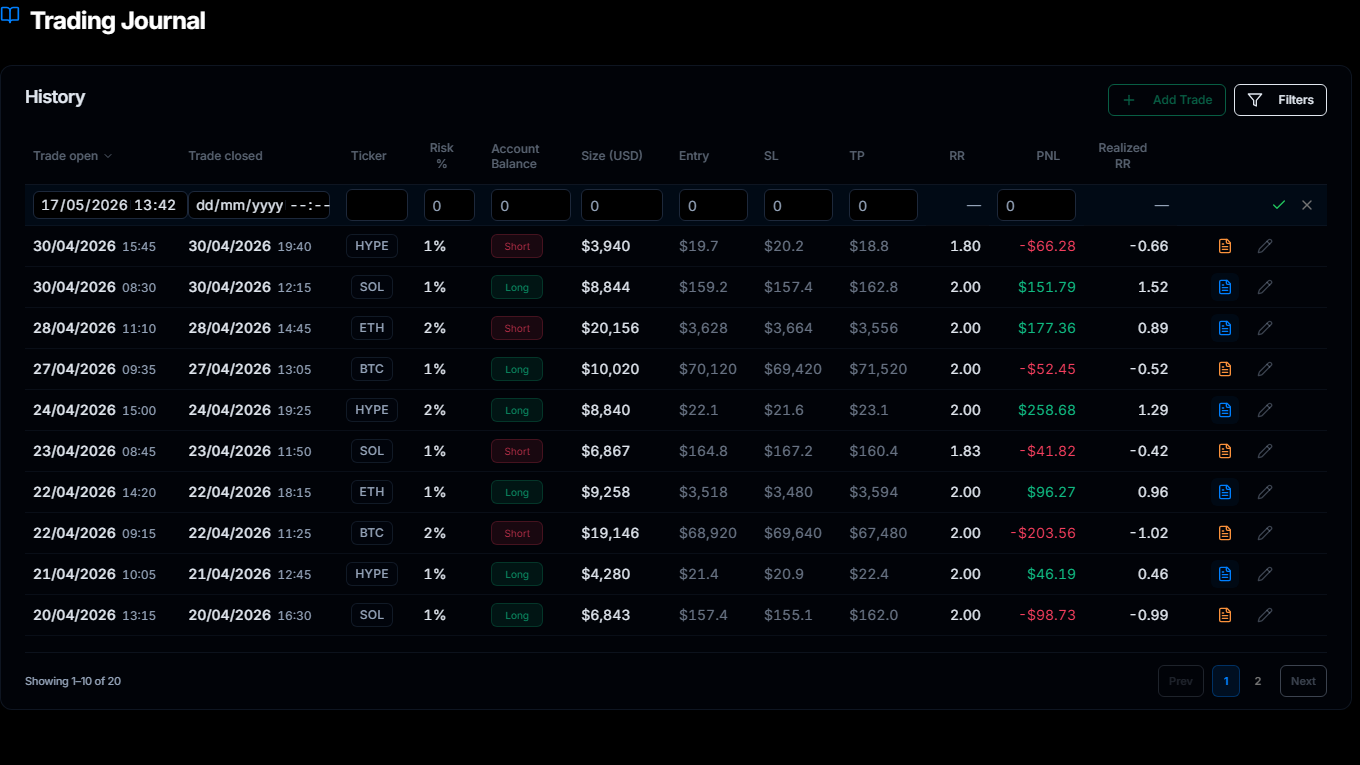
Record what was planned
Keep the planned risk, trade size, stop, target, and outcome attached to the trade record.
Step 3
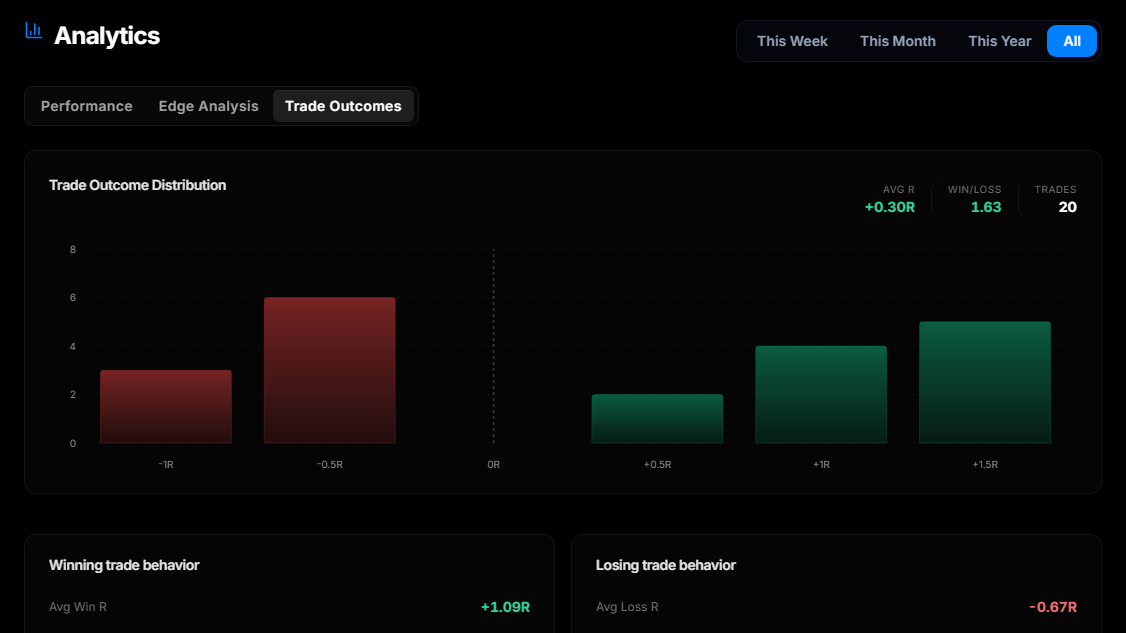
Review risk drift later
Use Trade Outcomes after the trade closes to see whether risk stayed close to the plan.
Position size is the first check
Position sizing turns a risk rule into a number. If the account balance, risk percentage, entry, or stop loss changes, the size should be recalculated before the trade is placed.
Position size = dollar risk / stop-loss distance
The position size calculator belongs before the trade. The trading journal belongs after the trade, when you review whether the position stayed inside the plan.
Three layers to keep separate
Risk becomes harder to understand when every problem is treated as the same problem. Separate the decision into three layers so each one can be reviewed clearly.
Trade-level risk: the amount at risk if the stop is hit.
Session-level risk: the point where you stop trading for the day.
Review-level risk: the pattern you see after several trades are logged.
Why rules alone are not enough
Most traders can name the basic rules: define the stop, size the trade from the risk amount, avoid chasing losses, and stop when the session limit is hit. The difficult part is seeing when the actual trade drifted away from those rules.
That drift is often small in the moment. A stop is adjusted slightly. A size is rounded up. A trade is taken after the original plan changed. None of that proves the trade was wrong, but it does give the review something concrete to inspect.
What to review after the trade
After the trade closes, the journal should answer practical questions without forcing you to rebuild the context from memory.
Did the size match the stop? If the stop moved before entry, the position size should reflect the final stop distance.
Did the trade stay inside the risk plan? Compare planned risk with the actual trade record instead of relying on memory.
Is the same drift repeating? Patterns across several trades matter more than one isolated trade.
Insight
Risk management becomes useful when it is measurable.
A written rule is a starting point. The review gets better when each trade shows the planned risk, actual size, stop, target, and outcome in the same workflow.
Scenario
A normal risk drift example
A trader plans a fixed risk amount before entry. The setup still looks valid, but volatility widens the stop. If the position size is not recalculated, the trade can carry more risk than the original plan allowed.
One trade like that may not explain much. Several trades like that can show a pattern: risk is drifting when conditions are fast or when the stop is adjusted late.
That is why risk planning and trade review need to stay connected.
Madlytics keeps risk planning and review connected
Madlytics does not tell you which trades to take. It helps you calculate size, record the trade, keep notes and screenshots attached, and review whether your actual trades stayed close to the risk plan.
Frequently asked questions
What is trading risk management?
How much should I risk per trade?
How does position sizing fit into risk management?
What should I review after a trade closes?
Does Madlytics give trading advice?
Make risk easier to review
Use Madlytics to plan position size before entry, keep risk context attached to the trade, and review the pattern after trades close.